Quick Start
Get up and running with SFDC File Exporter in under 10 minutes:
- Download and install the application for your platform (Windows, macOS, or Linux).
- Create a Connected App in Salesforce to get your Consumer Key and Consumer Secret.
- Open SFDC File Exporter and enter your credentials to connect.
- Choose an export method and start exporting.
Login Options
SFDC File Exporter provides two ways to connect to your Salesforce org. Choose the one that fits your situation:
Direct Login
Uses your Salesforce username and password directly — no Salesforce admin configuration required.
- No Connected App needed
- Works immediately after install
- Requires security token if IP not whitelisted
- Uses the Direct Login tab in the app
OAuth Login (Connected App)
Uses a Salesforce Connected App with Consumer Key and Consumer Secret — the recommended method for teams and recurring use.
- Requires one-time Connected App setup by an admin
- No security token ever needed
- Supports Auth Code (browser) or Client Credentials flows
- Uses the OAuth tab in the app
Installation
The download is a single .zip archive that contains launchers for all three platforms. Extract it and follow the steps for your operating system.
Windows
Download the Archive
Go to the Download page and click Download SFDC File Exporter — Windows to get the .zip file (~48 MB).
Extract & Run
Right-click the .zip and choose Extract All. Open the extracted folder and double-click SFDC_File_Exporter.exe. No installer needed.
macOS
Download the Archive
Go to the Download page and click Download SFDC File Exporter — macOS to get the .zip file (~52 MB).
Extract & Locate the App
Double-click the .zip to extract it. Open the mac/ subfolder — you'll find SFDC File Exporter.app inside. Optionally drag it to your Applications folder.
Bypass Gatekeeper on First Launch
Right-click the app and choose Open. Click Open again in the Gatekeeper dialog. This is a one-time step — after that you can double-click normally.
Linux
Download the Archive
Go to the Download page and click Download SFDC File Exporter — Linux to get the .zip file (~50 MB).
Extract & Open the linux/ Folder
Unzip the downloaded file: unzip "SFDC File Exporter.zip". Then open the linux/ subfolder inside the extracted directory.
Make the Launcher Executable & Run
In a terminal, run: chmod +x "SFDC File Exporter.sh". Then double-click SFDC File Exporter.sh in your file manager, or execute it directly from the terminal.
PATH. The Windows .exe bundles a launcher that will prompt you if Java is missing. On macOS and Linux, install Java from Adoptium if the app does not start.Step 1 — Create a Connected App in Salesforce
SFDC File Exporter's OAuth login authenticates with Salesforce using a Connected App inside your Salesforce org. This gives you a Consumer Key (Client ID) and Consumer Secret (Client Secret) that the app uses to authenticate on your behalf.
Steps to Create the Connected App
Open Salesforce Setup
Log in to your Salesforce org. Click the gear icon (⚙) in the top-right corner and select Setup.
Navigate to App Manager
In the Quick Find search box, type App Manager and click App Manager under Apps.
Create a New Connected App
Click the New Connected App button in the top-right of the App Manager page.
Fill in Basic Information
Enter the following in the Basic Information section:
Connected App Name: SFDC File Exporter
API Name: auto-fills based on the name — leave as-is.
Contact Email: your email address.
Enable OAuth Settings
Scroll to the API (Enable OAuth Settings) section and check Enable OAuth Settings. A form will expand below it.
Set the Callback URL
In the Callback URL field, enter:
http://localhost/callback
This URL is required by Salesforce but is not actually used by SFDC File Exporter's auth flow.
Add OAuth Scopes
Under Selected OAuth Scopes, add the following scopes by selecting them and clicking Add:
Access and manage your data (api)Perform requests on your behalf at any time (refresh_token, offline_access)
Save the Connected App
Click Save at the bottom of the page. Salesforce will show a notice that it may take 2–10 minutes to activate the Connected App. Click Continue.
Retrieve Consumer Key & Secret
After saving, you are taken to the Connected App detail page. Click
Manage Consumer Details (you may be prompted to verify your identity).
Copy and save the following — you will enter them into SFDC File Exporter:
| Field in Salesforce | Used as in SFDC File Exporter |
|---|---|
| Consumer Key | Client ID |
| Consumer Secret | Client Secret |
Set IP Relaxation (Recommended)
Go back to the Connected App detail page and click Manage → Edit Policies.
Under OAuth Policies, set IP Relaxation to
Relax IP restrictions. This ensures the app can connect from any machine.
Click Save.
Step 2 — Connect SFDC File Exporter to Salesforce
Open SFDC File Exporter and click New Connection. The connection form has two tabs — choose the one that matches how you want to authenticate.
Method A — Direct Login (Username + Password)
The simplest option — no Connected App setup required. Use your existing Salesforce login credentials directly.
Fields Required
| Field | Description |
|---|---|
| Connection Label | A friendly name for this connection (e.g., "Production Org"). Displayed in your saved connections list. |
| Username | Your Salesforce login email / username (e.g., user@company.com). |
| Password | Your Salesforce account password. |
| Security Token | Your Salesforce security token. Required if your IP address is not on the Salesforce trusted IP whitelist. Leave blank if your IP is already whitelisted. How to get your token → |
| Server | Select Production (login.salesforce.com), Sandbox (test.salesforce.com), or enter a Custom URL for a specific instance. |
Steps
Open the Application & Click "New Connection"
Launch SFDC File Exporter. Click New Connection on the right side of the connection screen.
Select the "Direct Login" Tab
Click the Direct Login tab at the top of the New Connection form.
Fill in Your Credentials
Enter your Connection Label, Username, Password, and Security Token (if required). Select the correct Server (Production or Sandbox).
Click "Save & Connect"
Click Save & Connect. SFDC File Exporter will authenticate using the Salesforce API and display your org name on success. The connection is saved automatically for future use.
Method B — OAuth Login (Connected App)
The recommended method for teams and recurring scheduled exports. Requires a Connected App created in Salesforce Setup (see Step 1).
Fields Required
| Field | Description |
|---|---|
| Connection Label | A friendly name for this connection (e.g., "Production OAuth"). Displayed in your saved connections list. |
| Client ID | The Consumer Key from your Salesforce Connected App. |
| Client Secret | The Consumer Secret from your Salesforce Connected App. |
| Username | Your Salesforce login email / username. |
| Environment | Select Production, Sandbox, or Custom URL. |
| Auth Flow | Auth Code — opens a browser for secure login (recommended). Client Credentials — machine-to-machine, no user interaction required. |
Steps
Open the Application & Click "New Connection"
Launch SFDC File Exporter and click New Connection.
Select the "OAuth" Tab
Click the OAuth tab at the top of the New Connection form.
Enter Your Client ID and Client Secret
Paste the Consumer Key (Client ID) and Consumer Secret (Client Secret) from your Salesforce Connected App. Add your Username and select the Environment.
Choose Auth Flow
Select Auth Code to open a Salesforce browser login (most secure) or Client Credentials for fully automated, headless authentication.
Click "Save & Connect"
Click Save & Connect. For Auth Code flow, a browser window will open — log in and approve. The app then receives the token automatically and displays your org name on success.
3. Export from List Views
This export method lets you target files associated with records in a specific Salesforce List View. Select an object, pick a list view, and export all files linked to every record in that view — in one operation.
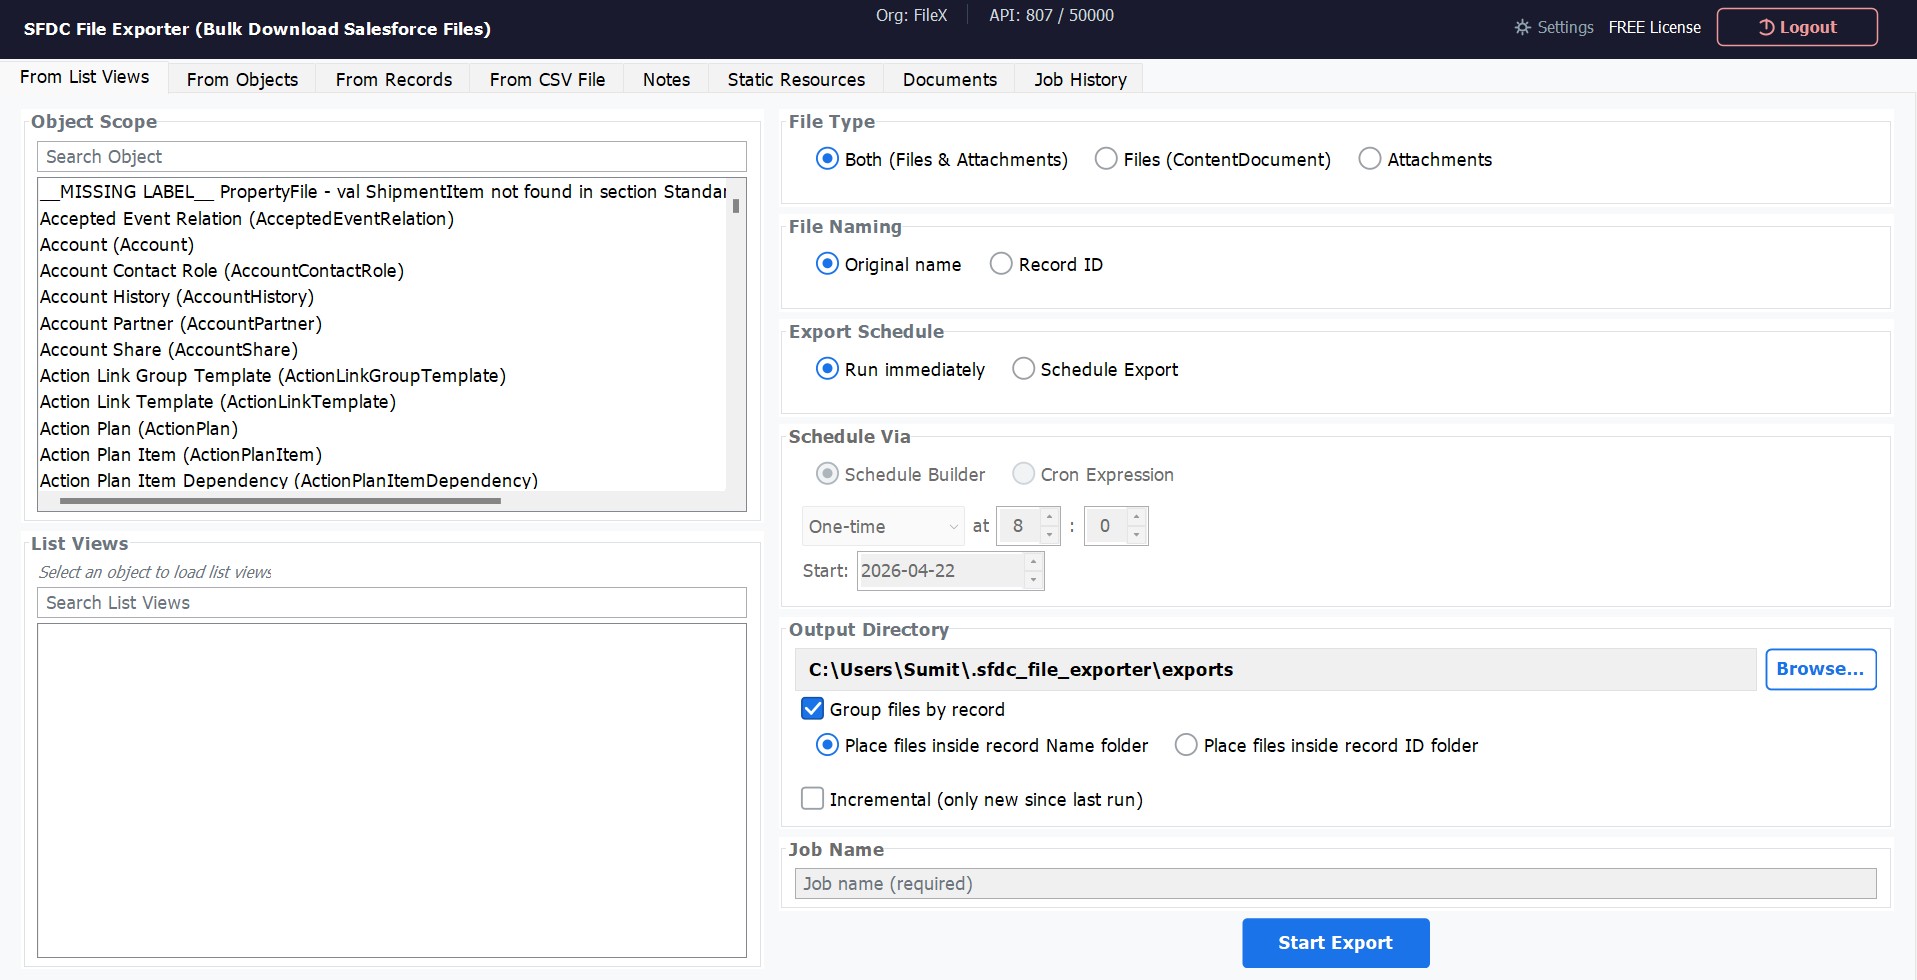
How to Use
Select Export Type
In the sidebar or main menu, choose Export from List View.
Choose a Salesforce Object
Select the object whose list views you want to browse — e.g., Account, Contact, Opportunity, or any custom object.
Select a List View
The app loads all list views defined for that object. Select the list view that targets the records you need.
Choose File Type
Select Files (ContentDocument), Attachments, or both.
Choose File Naming
Select whether to name exported files by their original file name or by the parent Record ID.
Set Output Folder & Export
Click Browse to select your destination folder, then click Export. Monitor the real-time progress bar.
4. Export from Objects (with Custom Filters)
The Object export mode lets you target all records of a specific Salesforce object — or your entire org — and download every attached file. Build field-level filters to narrow exactly which records are included.
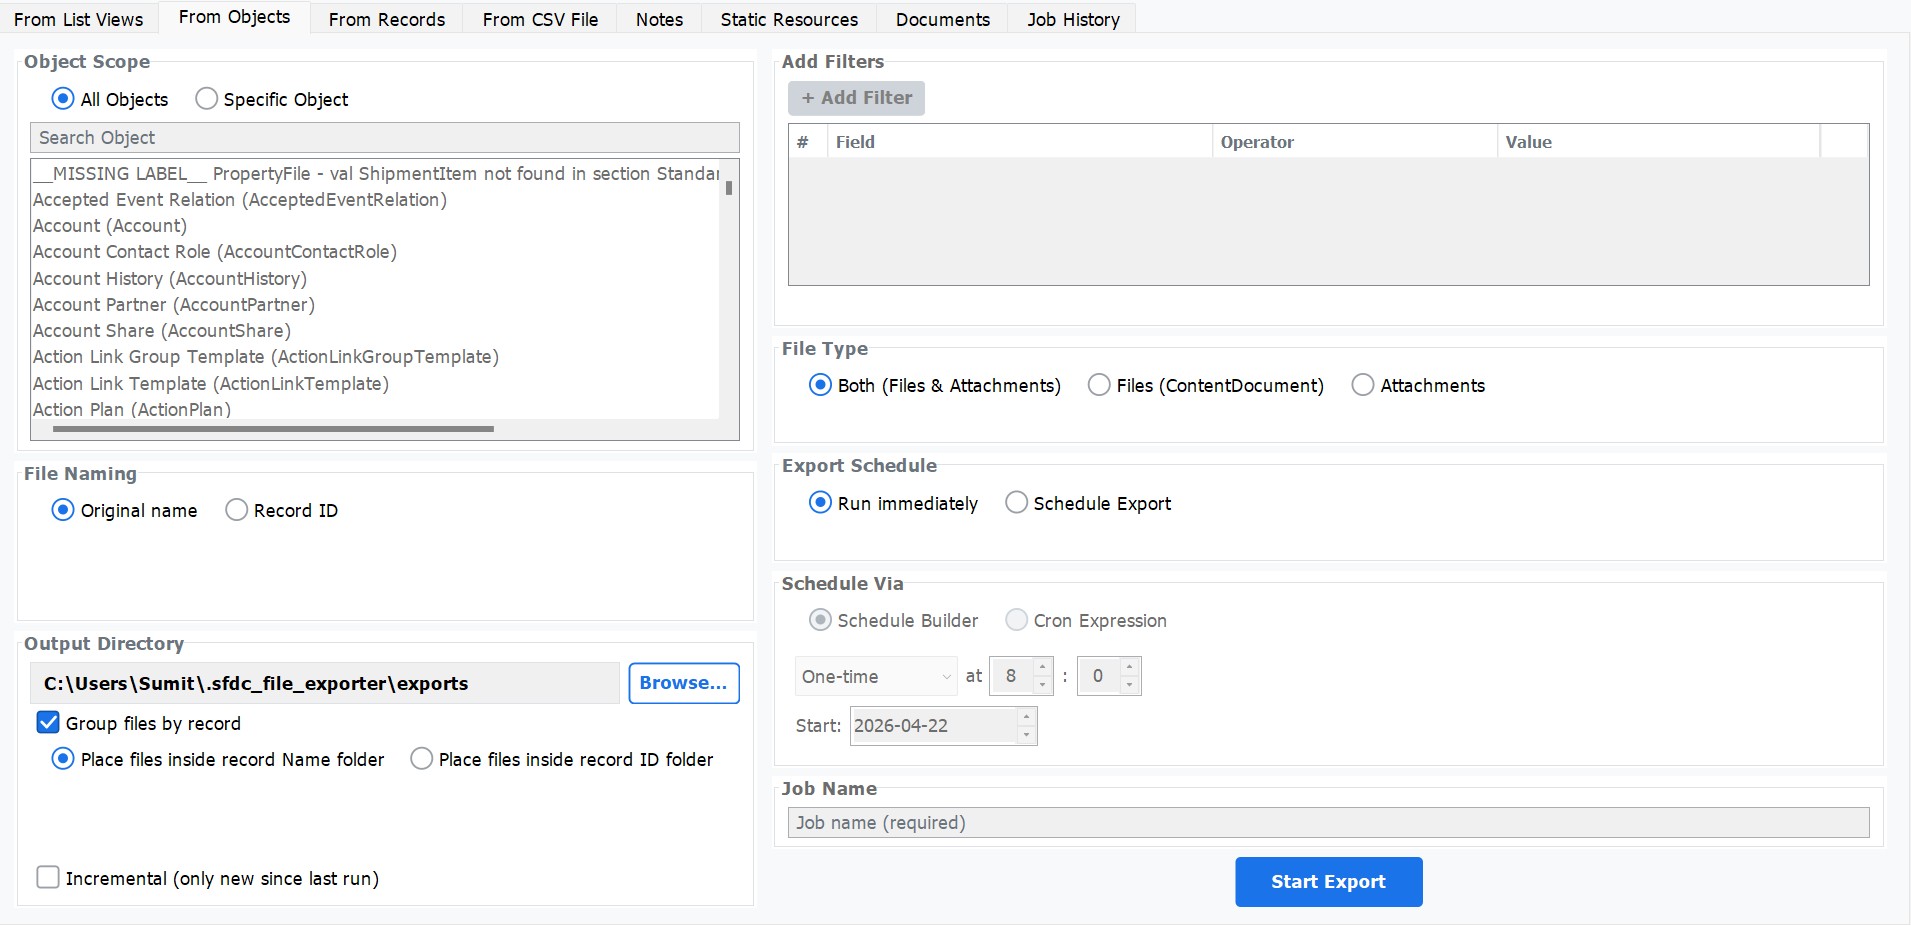
How to Use
Select Export Type
Choose Export from Objects from the main menu.
Choose Scope
Select All Objects (entire org) or Specific Object and pick the object from the dropdown (Account, Case, Opportunity, or any custom object).
Add Filters (Optional)
Click Add Filter to define field-level conditions. Each filter has three parts: Field, Operator (equals, contains, greater than, etc.), and Value. Add as many filters as needed — they are combined with AND logic.
Enable Incremental Mode (Optional)
Toggle Incremental Export to skip files that were already exported in a previous run. The app tracks the last export date automatically.
Choose File Type, Output Folder & Export
Select the file type, set your destination folder, and click Export.
5. Export from a Single Record & Child Records
Target one specific Salesforce record and download every file attached to it. Optionally extend the export to include files from all related child records — pulling the full file hierarchy in a single run.

How to Use
Select Export Type
Choose Export from Single Record.
Select the Object
Pick the Salesforce object the record belongs to (e.g., Account).
Search for the Record
Type the record name in the search box. Matching records will appear in the list — click the one you want.
Include Child Records (Optional)
Toggle Include Child Records to also export files from objects related to the selected record (e.g., Contacts, Cases, and Opportunities linked to an Account).
Choose Folder Grouping
Select whether to group exported files into sub-folders by the parent record's Name or ID.
Set Output Folder & Export
Set your destination folder and click Export.
6. Export Files Using a CSV of Record IDs
If you already have a list of Salesforce record IDs — from a report, data loader extract, or manual curation — upload them as a CSV and let SFDC File Exporter download every file associated with those records.
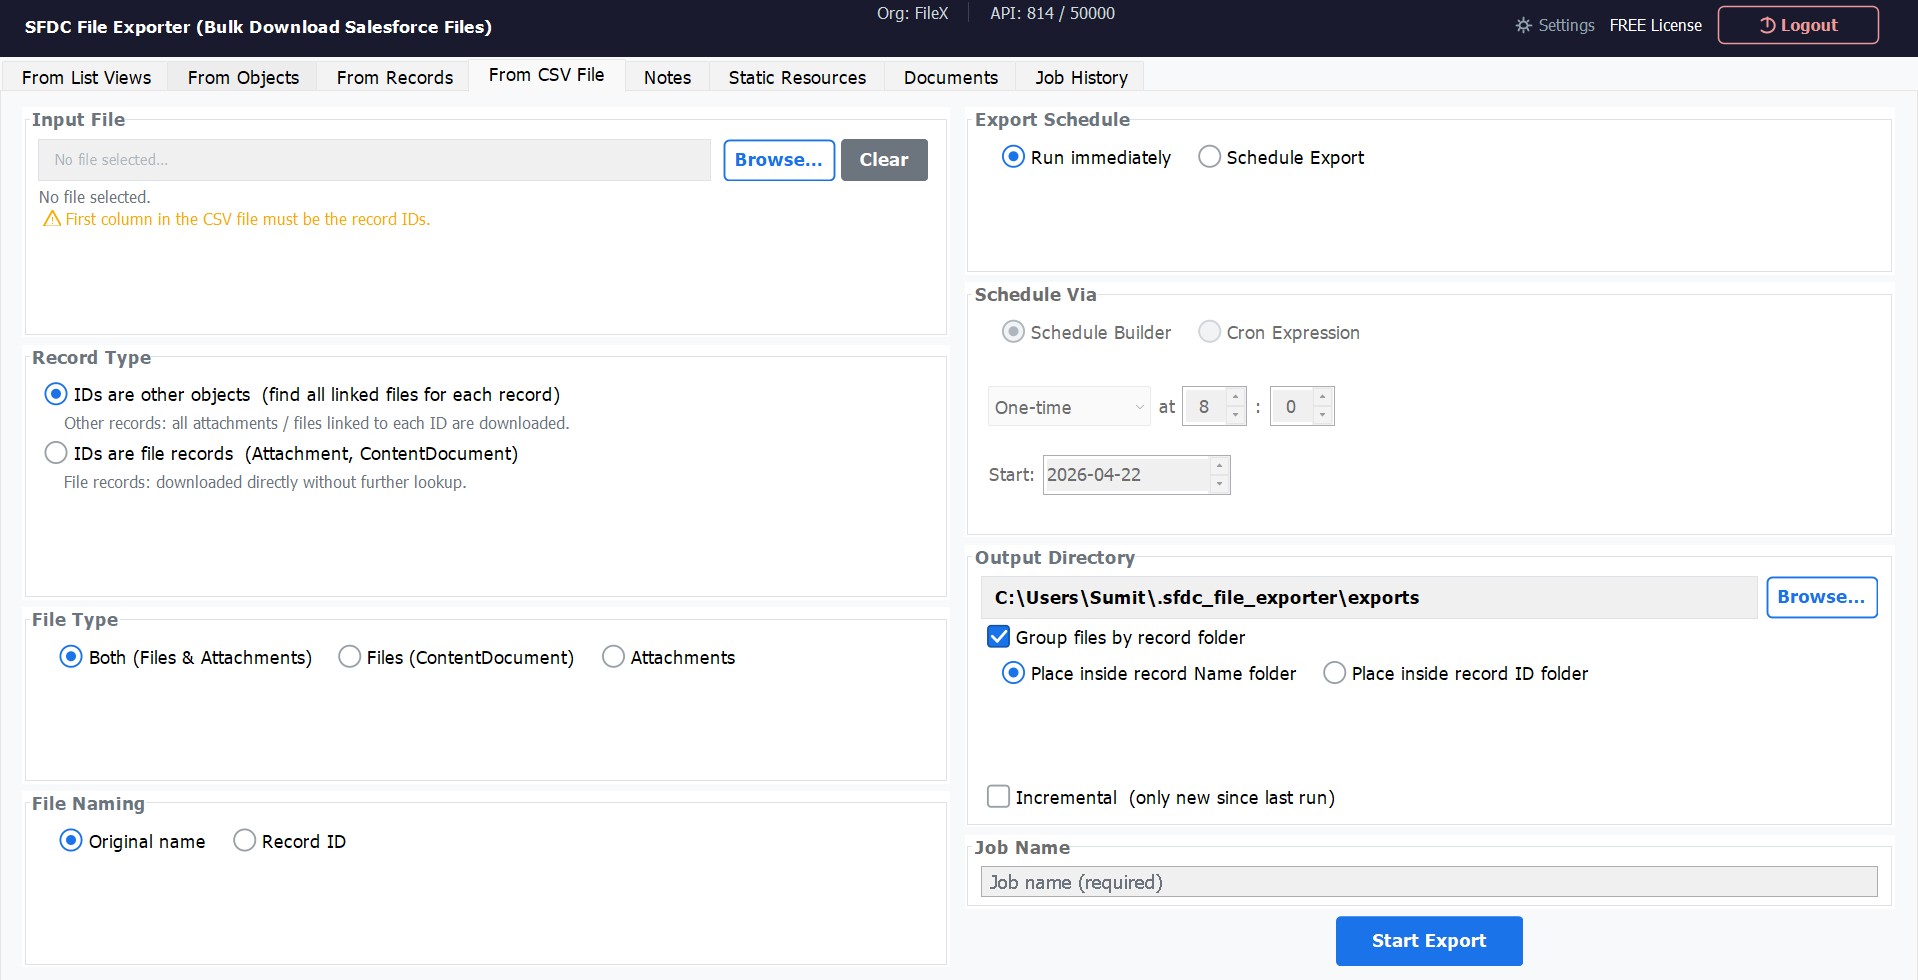
CSV File Format
Your CSV must have the Record IDs in the first column. A header row is optional but recommended.
Id
001XXXXXXXXXXXXXXX
001YYYYYYYYYYYYYYY
003ZZZZZZZZZZZZZZZHow to Use
Select Export Type
Choose Export from CSV.
Upload Your CSV
Click Browse and select your CSV file. The app previews the IDs found and the total record count.
Select ID Type
Choose whether the CSV contains Parent Record IDs (the app fetches all attached files for each) or File Record IDs (downloads those exact files directly).
Choose File Type & Output Folder
Select Files, Attachments, or both, then set your destination folder.
Export
Click Export. The app processes each ID from your CSV and downloads all matching files.
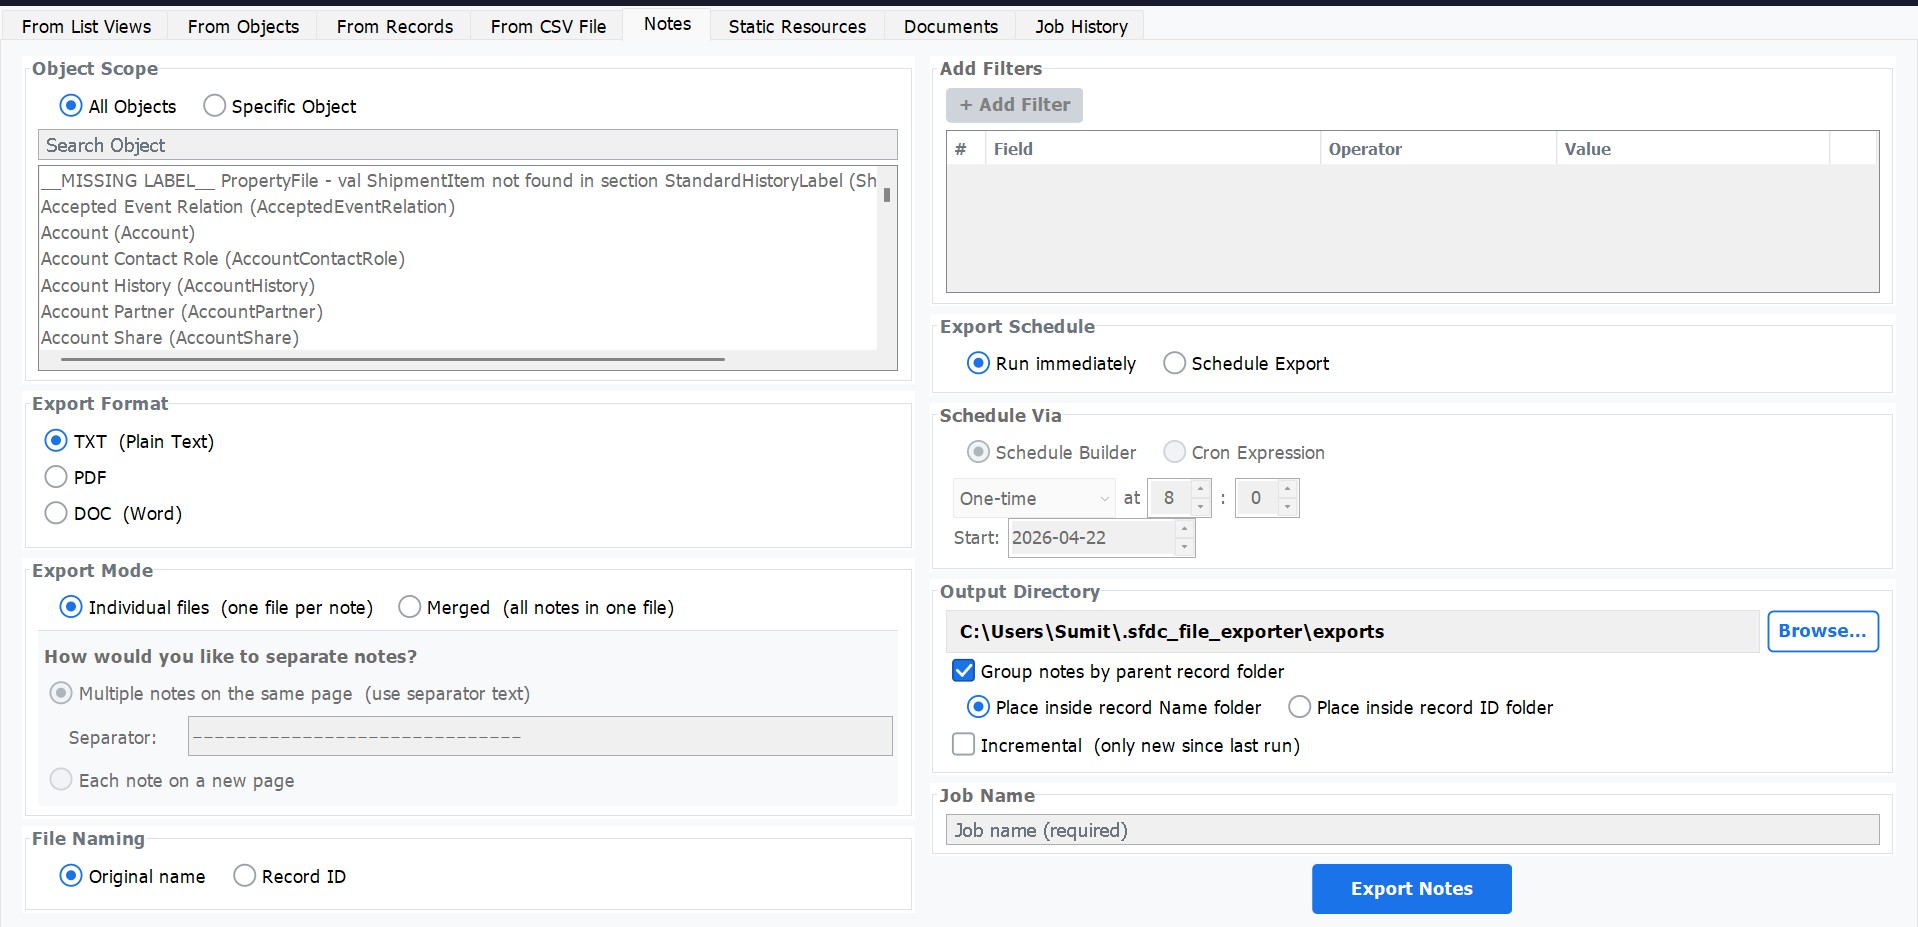
7. Export Salesforce Notes
Export all Salesforce Notes from your org in the format that best suits your workflow — plain text, PDF, or Microsoft Word. Merge all notes into a single document or export each note as its own file.
Output Formats
| Format | Best For |
|---|---|
TXT | Plain-text archiving, easy to search and index. |
PDF | Sharing, printing, compliance archiving. |
DOC (Word) | Editing, merging into reports, further processing. |
How to Use
Select Export Type
Choose Export Notes from the main menu.
Choose Output Format
Select TXT, PDF, or DOC.
Choose Export Mode
Individual files — one file per note, named after the note title.
Merged — all notes combined into one file with a separator between each.
Set Separator (Merged Mode Only)
Enter the separator text to appear between notes in the merged file (e.g., --- or a horizontal rule).
Group by Parent Record (Optional)
Toggle Group by Record to create sub-folders per parent record, placing each record's notes inside its own folder.
Set Output Folder & Export
Set your destination folder and click Export.
8. Export Salesforce Static Resources
Download all Static Resources from your Salesforce org — JavaScript libraries, CSS stylesheets, images, fonts, and any other assets deployed to your org's pages. Apply filters to scope by name, type, or any other Static Resource field.
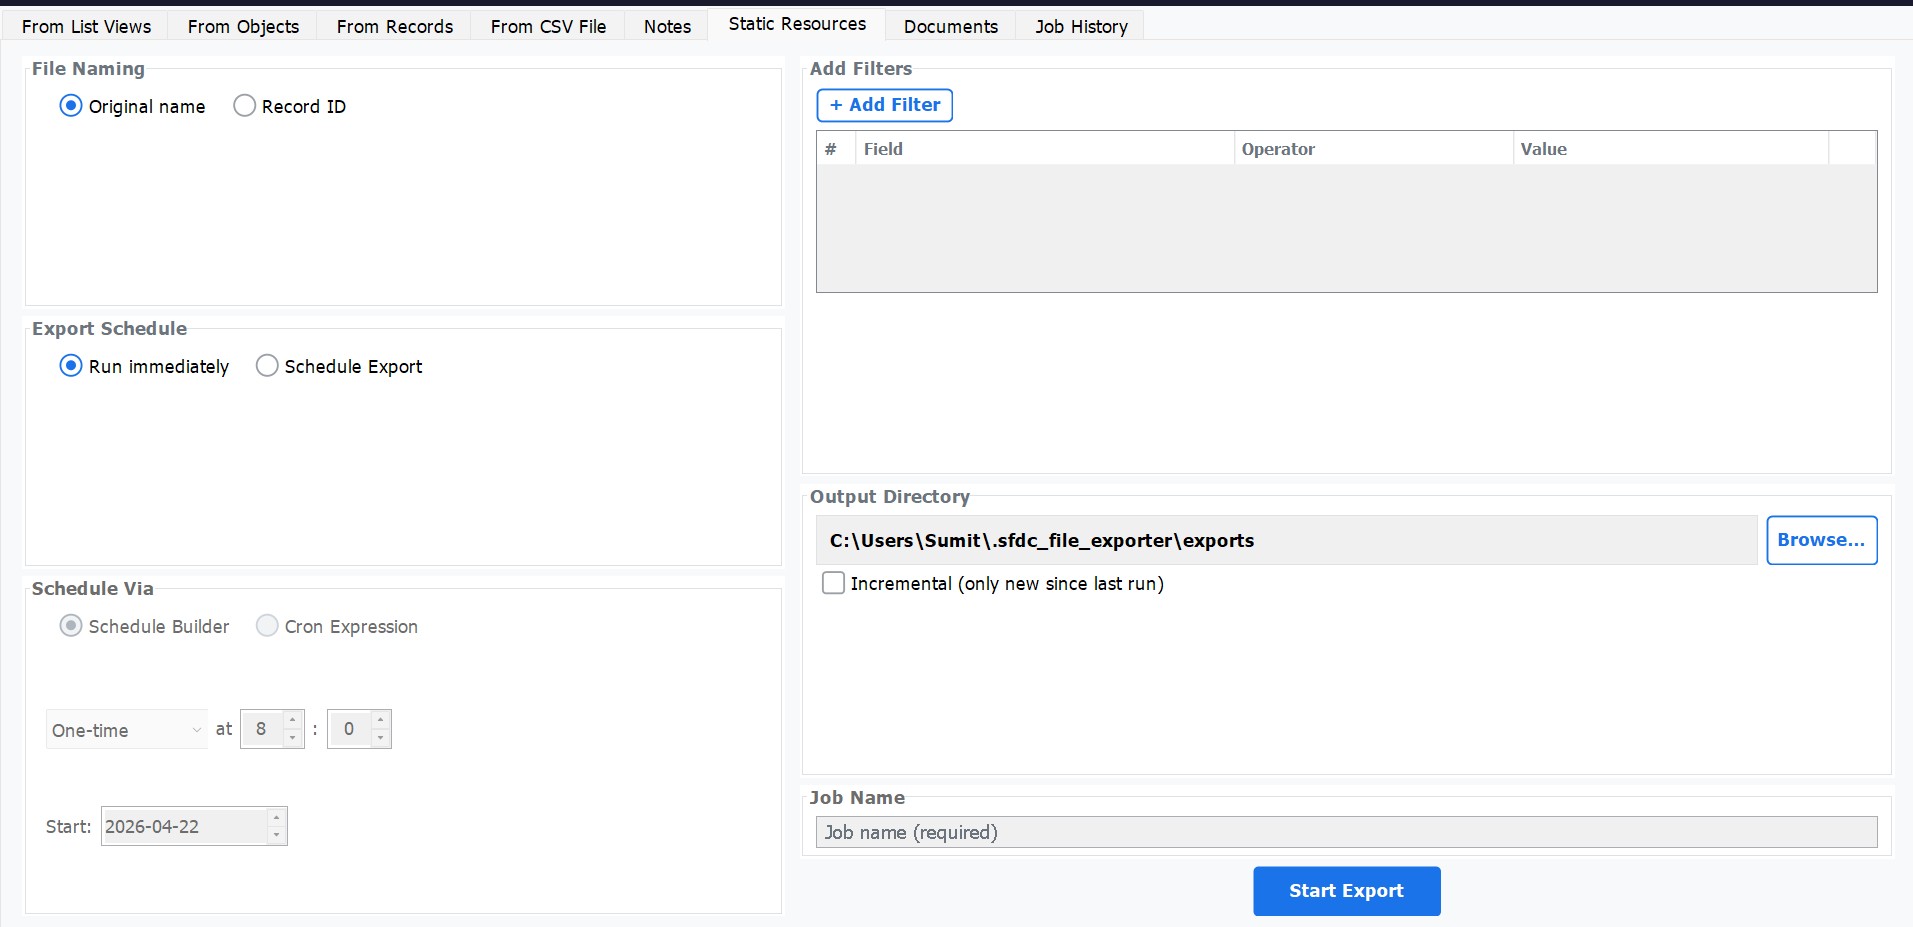
How to Use
Select Export Type
Choose Export Static Resources.
Add Filters (Optional)
Click Add Filter to narrow the export by fields such as Name, ContentType, or CreatedDate.
Choose Incremental Mode (Optional)
Enable Incremental Export to only download resources added or modified since the last run — useful for keeping a local copy in sync with production.
Set Output Folder & Export
Set your destination folder and click Export. Original resource file names are preserved.
9. Export Salesforce Documents
The Salesforce Document object stores org-wide files in document libraries — not linked to individual records. This is a legacy storage type, but many orgs still hold important files there. SFDC File Exporter exports all Documents in their original format with full field-level filtering support.
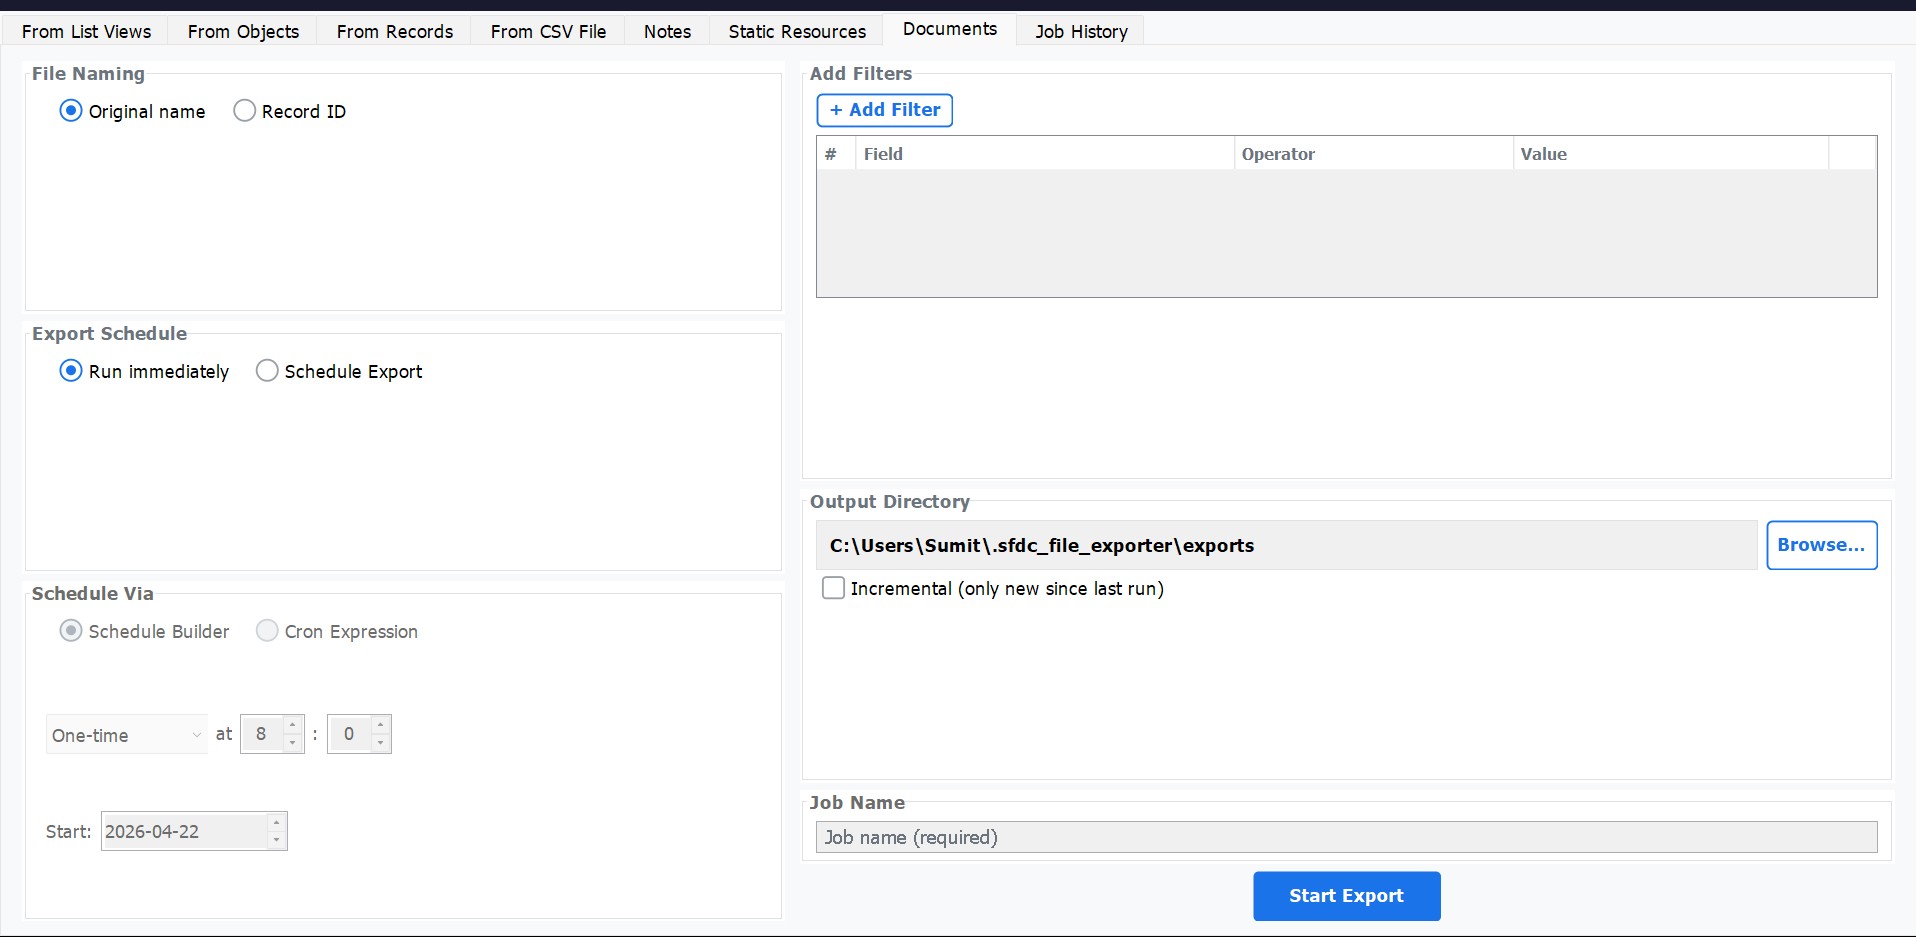
How to Use
Select Export Type
Choose Export Documents from the main menu.
Add Filters (Optional)
Narrow the export using field-level filters — for example, FolderId (document folder), AuthorId (file owner), or CreatedDate.
Choose Run Mode
Run the export immediately or configure a schedule for recurring downloads.
Set Output Folder & Export
Set your destination folder and click Export. Original document file names are preserved.
10. Scheduled Exports
Any export type can be converted into a recurring scheduled job. Configure jobs to run on a fixed interval or via a custom cron expression, then monitor and manage all jobs from the Job History dashboard.
How to Schedule an Export
Configure Your Export
Set up the export as normal — select the type, object, filters, and output folder.
Click "Schedule" Instead of "Export"
Click the Schedule button to open the scheduler, instead of running the export immediately.
Choose a Schedule Type
Select Once, Daily, or use a Custom Cron Expression for advanced scheduling (e.g., every Monday at 2 AM).
Set the Time
Pick the time (and day, if using weekly/monthly) for the job to run.
Enable Incremental Mode (Recommended)
Enable Incremental Export so each scheduled run only downloads files added or modified since the previous run — keeping your local copy up to date without re-downloading everything.
Save the Job
Click Save Schedule. The job appears in the Job History dashboard immediately.
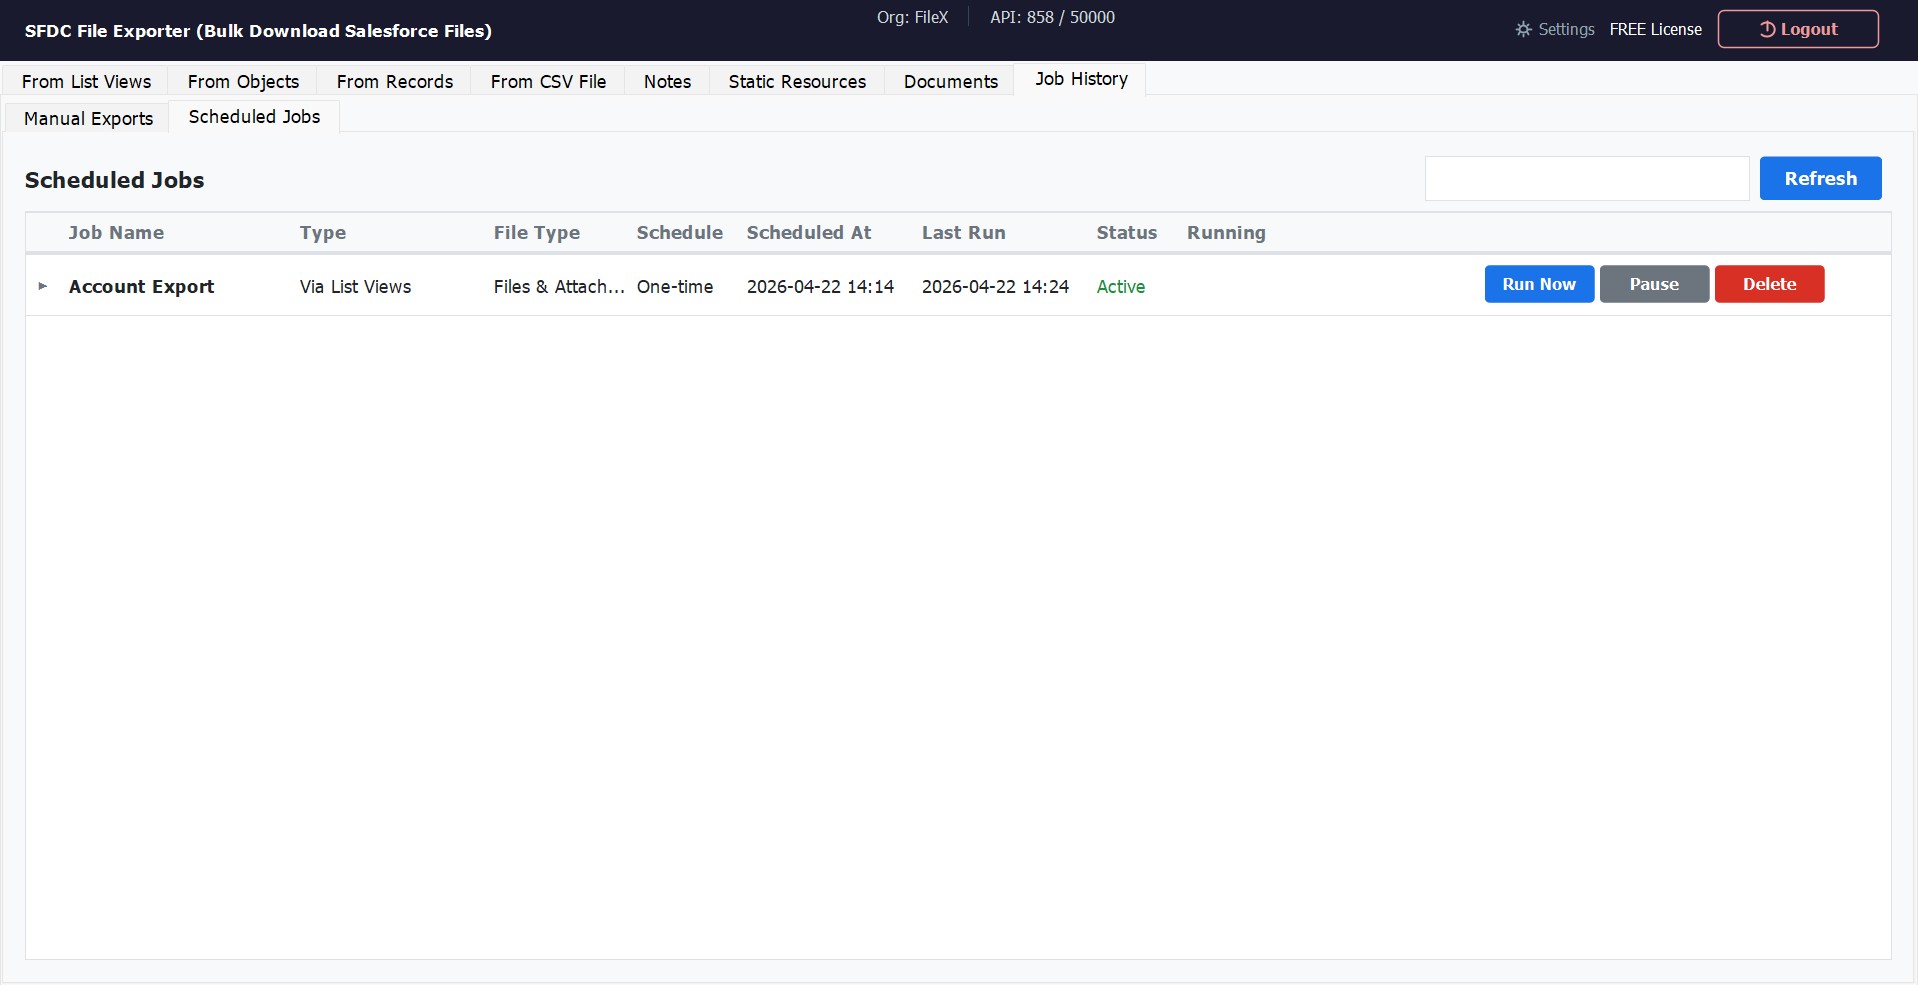
Managing Jobs from the Job History Dashboard
| Action | Description |
|---|---|
| Run Now | Trigger a scheduled job immediately, regardless of its next scheduled time. |
| Pause | Temporarily suspend a job. It retains all its settings and resumes when unpaused. |
| Delete | Permanently remove a scheduled job. This cannot be undone. |
License Activation
SFDC File Exporter is free for up to 50 files per export. To unlock unlimited exports and all Pro features, purchase a license from the Pricing page. You will receive a license key by email.
How to Activate
Open the App
Launch SFDC File Exporter.
Go to License Settings
Navigate to Settings → License or click the key icon in the toolbar.
Paste Your License Key
Copy the license key from your purchase email and paste it into the license field.
Click Activate
An active internet connection is required. Activation completes instantly.
Troubleshooting
If using Direct Login (username + password):
- Your Security Token may be required — enter it in the Security Token field. Reset your token →
- Confirm your username and password are correct (same as your Salesforce web login).
- Verify you selected the correct Server (Production vs. Sandbox).
If using OAuth Login (Connected App):
- Double-check that you copied the Consumer Key and Consumer Secret exactly — no extra spaces.
- Ensure the Connected App in Salesforce has been saved for at least 2–10 minutes before connecting (Salesforce propagation delay).
- Verify that the Connected App's IP Relaxation is set to Relax IP restrictions.
- Confirm you selected the correct Environment (Production vs. Sandbox).
Can't find an answer? Contact our support team — we respond within one business day.